May 16, 2011

The Creamiest Scrambled Eggs Served over Roasted Asparagus


Scrambled eggs make a quick and yummy meal, but there is a little science behind making them perfect. The way I prefer them is soft, fluffy, juicy and custard-like. Here are my essential tips to the creamiest scrambled eggs. Just remember, low gentle heat is the secret to success.

Use a fork to whisk the eggs until they are frothy and evenly colored. Add in freshly cracked black pepper. DO NOT OVER BEAT or add salt, as both would cause the eggs to toughen. This is the point where I add my secret ingredient. I say secret because for those that have tried my eggs, boasted of how creamy and delicious they were, but did not know that it was a Kraft American cheese slice that took my eggs to a whole other level. I have tried many times with other brands of American cheese, deli American cheese, shredded cheddar, monterey jack and swiss and all make the eggs too cheesy. Trust me when I say that Kraft is the way to go here. Now, if you don't have cheese, you can add a teaspoon of cream, but never milk, which may cause rubbery eggs.

Try this method, I seriously think you will change the way you make your morning eggs.

Pairing Suggestion: A newly found fave is half Moscato and half orange juice for a sweet Mimosa. Freshly squeezed would be perfect.

Ingredients
3 Fresh Eggs
Butter (1 tsp per egg)
Freshly cracked black pepper
1 slice of Kraft American Cheese torn into small pieces (1/2 slice for two eggs)
flaky sea salt

As far as the pan you choose, always go with a heavy bottomed non-stick saute pan, which will evenly distribute the heat. Also choose the smallest saute pan you have, as one that is too large will have the eggs spreading too thinly and cook too quickly.

Heat your saute pan over medium-low heat. Melt 1 teaspoon of butter per egg until melted and the foam has resided. When all the butter is melted reduce the heat to low and add your beaten egg mixture. Using a silicone spatula, wait until the first hint of setting begins before you stir. The more you stir the eggs, the more custardy they will be. Near the end of the cooking time, the eggs will get much thicker, but still creamy. Take the eggs off the heat approximately 1 minute before you think the eggs are done. The eggs will continue to cook even though they have been taken away from the heat, due to the heat from the pan and the "carry over heat."

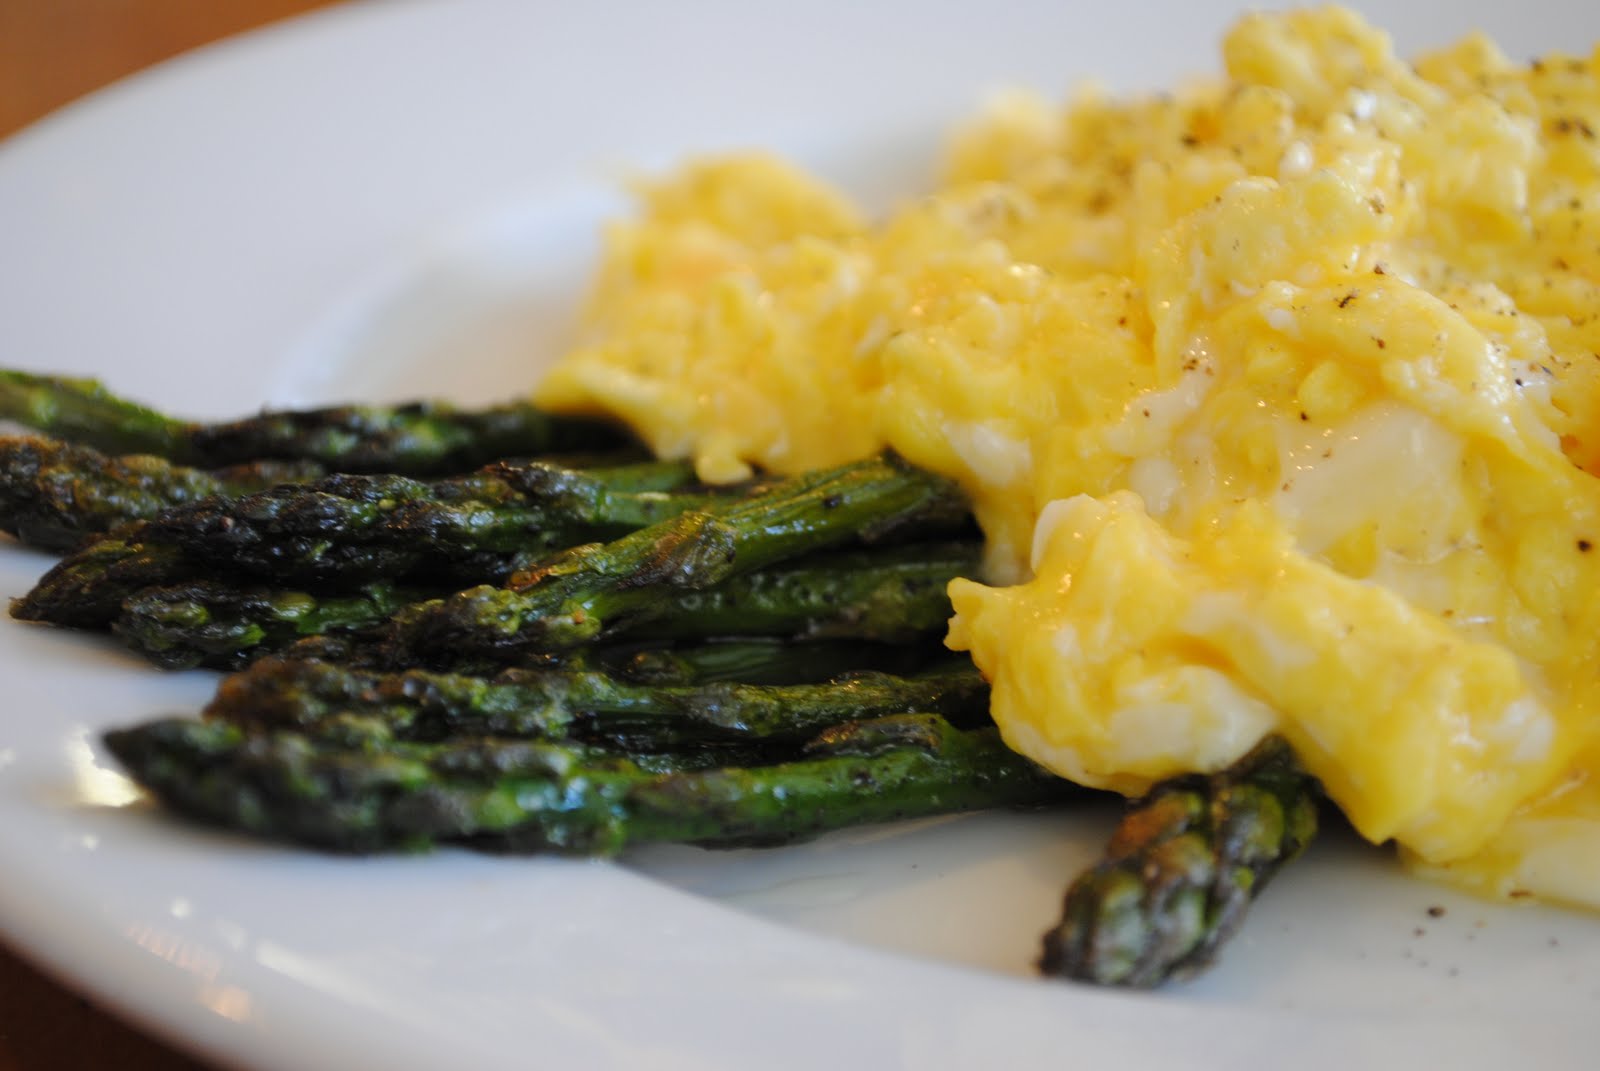
Immediately transfer them to your serving plates and serve hot. As you can see, my favorite way to enjoy is plated over roasted asparagus. It is quite a delightful combination.


Enjoy!

May 14, 2011

Glazed Chocolate Banana Doughnuts

Chocolate covered anything is King in my book. Case in point, these little rascals are worth all the kneading, rolling and cutting it takes to get you to these chocolate dipped beauties. Katie started school recently, and will soon be making Challah bread every week. So I thought I would introduce her to making breads and working with yeast. She had a great time watching and learning, kneading and rolling, and of course glazing the doughnuts and licking her fingers was her favorite part.
My favorite part was the sight of her chocolate covered joyous face, as she enjoyed every finger-licking bite.
The banana flavor was perfection and even though the chocolate glaze was oh so yummy, these would also be nice with either a cream cheese glaze or a maple glaze. Hmmm...for next time.

I know that you will enjoy these warm and freshly glazed rings of scrumptiousness.

Glazed Chocolate Banana Doughnuts
Courtesy of BHG (Prize tested recipe)
Makes 30 Doughnuts plus holes

Ingredients
5 1/2 to 6 1/2 cups all-purpose flour
2/3 cup granulated sugar
2 pkg. active dry yeast
1 tsp salt
3/4 cup milk (I used 1%)
1/2 cup unsalted butter (1 stick)
3 medium bananas, mashed (1 cup)
2 eggs, plus 2 egg yolks
enough vegetable or canola oil to deep fry the doughnuts

For the Glaze
1/2 cup semi-sweet chocolate pieces
1/4 cup whipping cream
2 tbsp butter
3/4 cup powdered sugar
2 tsp light corn syrup

Directions
In bowl combine 1 1/2 cups of the flour, the sugar, yeast, and 1 tsp salt; set aside. In saucepan combine milk and butter. Heat until warm (125 F). Add to flour mixture. Add bananas, eggs, and yolks. With mixer, beat on medium for 2 minutes. Stir in 3 1/2 cups flour, adding additional flour 1/4 cup at a time. (Dough will be sticky.) Transfer to a buttered bowl; turn to coat surface. Cover; let rise 1 hour or until doubled.
On floured surface roll dough to 3/8-inch thickness. Cut wth floured 2 1/2-inch doughnut cutter. Reroll dough and repeat. Place cutouts on baking sheet. Cover; let rise 30 minutes or until doubled.
Fry a few at a time in hot oil (365 F) for 2 minutes or until golden; turning once. Remove with slotted spoon; drain. Dip in glaze.

Make the glaze in a microwave-safe bowl combining the semi-sweet chocolate pieces, whipping cream and butter. Microwave for 1 minute and stir. Microwave 3 seconds more. Whisk in the powdered sugar until smooth and corn syrup.

Now, sit back with a favorite cup of warmth and enjoy!

March 21, 2011

Cocoa Brownies with Browned Butter

What can I say....these brownies are a show stopper. It's the browned butter that stopped me in my tracks while reading my bon appetit magazine last month, and I had a batch ready to back that day. I am a huge fan of browned butter on anything sweet or savory, and come one....who can say no to anything with cocoa in it? These brownies are spectacular and very rich, but my oh my, if you love chocolate, you will seriously fall in love with these babies. The browned butter adds a wonderful nutty flavor that is killer. The original recipe calls for walnuts, which would be a great addition, however, it's the one ingredient that I didn't have.
Seriously....make these today! You can and will thank me later!


Pairing Suggestion: A tall glass of cold milk...Oh My

Cocoa Brownies with Browned Butter
Courtesy of Bon Appetit
Makes 16


Ingredients
Nonstick vegetable oil spray
10 tbsp (1 1/4) sticks unsalted butter, cut into 1-inch pieces
1 1/4 cups sugar
3/4 cup natural unsweetened cocoa powder (spooned into cup to measure, then leveled)
1 tsp vanilla extract
2 large eggs, chilled
1/3 cup plus 1 tbsp unbleached all purpose flour
1 cup walnut pieces (optional)

Directions
Position rack in bottom third of oven, preheat to 325 degrees F. Line 8x8x2 inch metal baking pan with foil, pressing foil firmly against pan sides and leaving a 2 inch overhang. Coat foil with nonstick spray. Melt butter in medium saucepan over medium heat. Continue cooking until butter stops foaming and browned bits form at bottom of pan, stirring often, about 5 minutes. Remove from heat, immediately add sugar, cocoa, 2 teaspoons water, vanilla and 1/4 teaspoon (generous) salt. Stir to blend. Let cool 5 minutes (mixture will still be hot). Add eggs to hot mixture 1 at a time, beating vigorously to blend after each addition. When mixture looks thick and shiny, add flour and stir until blended. Beat vigorously 60 strokes. Stir in nuts if using. Transfer batter to prepared pan.

Bake brownies until toothpick inserted into center comes out almost clean (with a few moist crumbs attached), about 25 minutes (I started checking at 20 minutes and took out of oven at about 23 minutes). Cool in pan on rack. Using foil overhang, lift brownies from pan. Cut into 4 strips. Cut each strip crosswise into 4 brownies.
This can be made 2 days ahead. Store airtight at room temperature.

Now it's time to savor to your hearts content.

March 16, 2011

Pork and Green Chile Stew

Pork rules!! At least in my family it does. Whether it be ribs, chops, tenderloin, bacon, sausage, you name it, it will always be welcome here. I myself am a soup/stew lover. So I thought, why not combine the two throwing in some of our favorite veggies, and Voila. A quick yummy and very hearty stew to warm your heart. I couldn't decide on calling it a stew or a chili, but whatever you want to call it, it's quick and very satisfying. I think that it will stay a family favorite for a long time.
You could use whatever pork cut you have on hand, however I recommend using tenderloin as it will not toughen up in the pot and will stay very tender, giving you a scrumptious bite.

Pairing Suggestion: A White Alsatian, or an American Riesling would be a sweet compliment.

Pork and Green Chile Stew
Makes 4 Servings

Ingredients
1 lb. Pork Tenderloin (cut into 3/4 inch pieces)
salt and ground black pepper
1 tbsp olive oil
3 carrots (peeled and chopped)
1 onion (chopped)
2 garlic cloves (diced)
2 cans of white beans (drained and rinsed)
1 4.5 oz. can diced green chiles
1/2 tsp ground cumin
2-3 cups low sodium chick stock/broth
1 bag of baby spinach
1 bunch fresh cilantro (chop half the bunch and leave some whole leaves for garnish)
lime wedges

Directions
Sprinkle pork lightly with salt and pepper. In dutch oven heat olive oil over medium-high heat, add pork and cook for 4-5 minutes or until browned. Take pork out of pot and keep warm in separate bowl. Add onion and carrots and saute for about 5 minutes until soft. Add in garlic, white beans, green chiles, and cumin. Cook for about 10 minutes. Add in chicken broth and the chopped cilantro. Cook another 5 minutes to bring up to a simmer. Using a hand blender, blend stew till slightly thickened, leaving some chunks of veggies. (If you are using a blender, blend about half the mixture.) Return the pork back into the pot and add the rest of the cilantro leaving some for garnish. Bring up to a simmer. Add baby spinach and cook, covered, over medium heat for about 15 minutes, stirring occasionally. If the stew is too thick for you, add as much broth or water as you need to get it to the consistency you would like.
Ladle into soup bowls and top with cilantro and a squeeze of lime.

Enjoy!
I know you'll like this one!!!

January 3, 2011

Philippine Style Chicken Adobo

I grew up with mom making her Philippino chicken Adobo quite often. There was always a flavor in the dish that always stood out more than anything else, but as a child, I had no clue what that was. It wasn't until I got older and watched mom cook this dish...I always saw her throw dried leaves into the pot. As I began exploring cooking in my own kitchen, that's when I realized how those dried leaves can alter the taste of any stew and give it that complex flavor. When I think of bay leaves now, I can't help but think of mom's chicken adobo. Mom's adobo was a very stewy dish with the chicken falling off the bones from the long cooking times. Mom always used bone-in chicken thighs with the skin on. This dish was indeed mom's comfort food.

In Filipino cuisine, adobo refers to a common cooking process indigenous to the Philippines. When the Spanish invaded the Philippines in the late 16th century through Mexico City, they found an indigenous cooking process that involved stewing with vinegar. They referred to this method as "adobo". Over time, dishes prepared in this manner came to be known by this name as well.

When I stumbled upon this recipe for this chicken adobo in Gourmet magazine, I was so excited to try it and share with my mom. It's totally different from the way mom cooked her adobo, but I love that it's an easy way to get the flavors of that childhood dish in less time. The vinegar and bay leaf combo gives the chicken a clean tangy flavor. The marinade served over chicken and steamed rice is an ideal pairing.

On a side note - this dish is a family favorite. My 3 year and hubby ask for this quite often.

Pairing Suggestion: A Gewürztraminer or Sauvignon Blanc would be a nice match with this tangy dish.

Philippine-Style Chicken Adobo
Adapted from Gourmet Magazine (December 2002)
Serves 4

Ingredients
1/2 cup cider vinegar
1/4 cup soy sauce
1 tbsp minced garlic (I used 2 tbsp) (What can I say...I'm a garlic lover)
2 bay leaves (I used 1 bay leaf)
4 whole chicken legs (cut into drumsticks and thighs) ( I used boneless, skinless chicken thighs)

Directions
Stir together vinegar, soy sauce, garlic, bay leaves, and 1/2 teaspoon black pepper in a bowl, then pour into a sealable plastic bag. Add chicken and seal bag, pressing out air. Turn to coat thoroughly, then put bag in a baking pan and marinate chicken, chilled, turning occasionally, 2 hours.

Let chicken stand at room temp for 45 minutes. Preheat oven to 425 degrees.

Arrange chicken, skin sides up, in 1 layer in a 13-by-9-by-2- inch metal baking pan and pour marinade over it. Bake in middle of oven until cooked through, 30-35 minutes.

Transfer chicken, skin sides up, to a broiler pan. Pour marinade into a small saucepan and skim fat.
Preheat broiler. Broil chicken about 4 inches from heat until skin is golden and crisp, 2-3 minutes. While chicken is broiling, bring marinade to a boil and discard bay leaves. Serve chicken sauce over steamed rice.

Enjoy!